
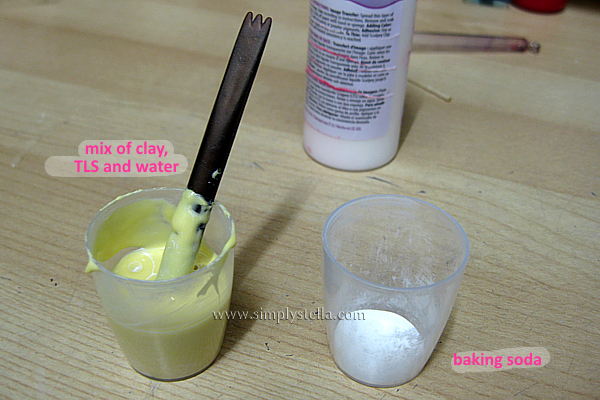
Pandoro in scala 1:6 realizzato con Fimo e lievito... o, come preferisco chiamarlo, "Cronaca di un pasticcio annunciato"..
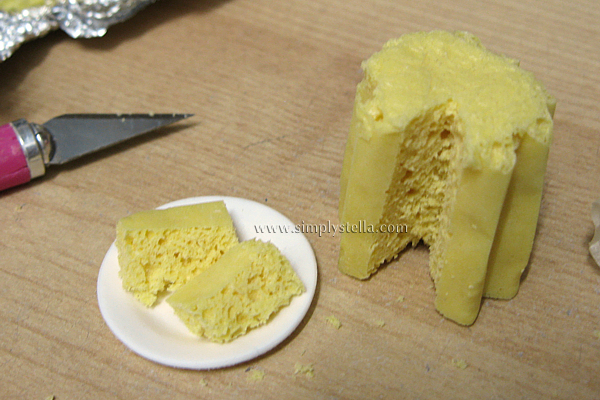
Avevo gia sperimentato la tecnica del lievito in passato, ma sempre e solo per fare delle "fette" di pane, mai una forma intera.
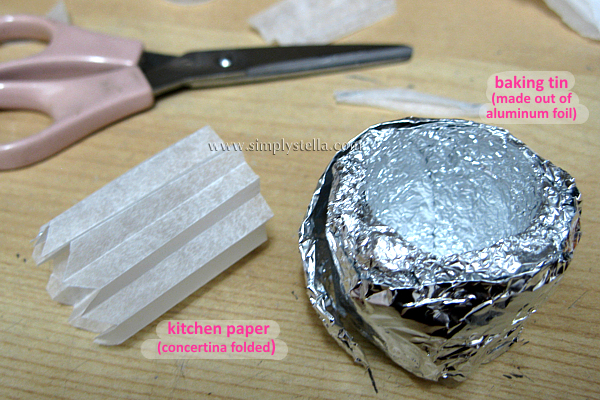
Trovare il modo di fare la forma giusta per il pandoro è stata un'impresa.. finita in fallimento
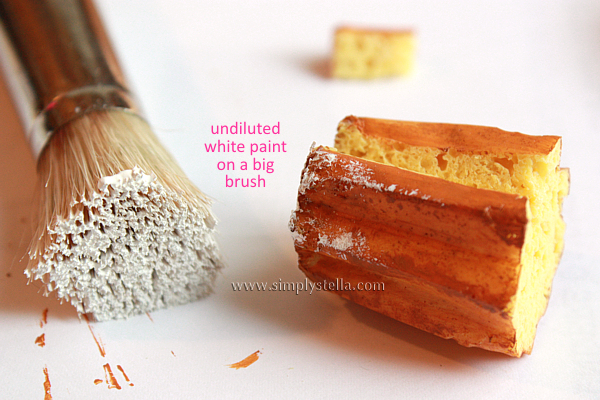
Fotoracconto del disastr..ehm, Making of dopo il salto!
You can find the Making Of after the jump!Use the Translator in the side bar to read this site in your language


Tht's AWESOME!
RispondiEliminaThank you ^w^
RispondiElimina*hugs*
so cool!! thankx for this tutorial, I think I will give it a try, this is so realist :)
RispondiElimina@ Carol - Thank you and have fun :D
RispondiEliminaciao hai per caso il template del box del pandoro? è bellissimo! grazie
RispondiEliminaGrazie, il template l'ho fatto io ma non è disponibile per il download :)
RispondiEliminaMay I ask how much water you added in the mixture?
RispondiEliminaI've never really used a precise amount of water, just keep adding a few drops at a time until you reach a creamy, glaze-like consistency ;)
EliminaYou can find more detailed instructions on this tecnique here:
http://www.simplystella.com/goodies/tutorials/ClayBakingSoda.htm
Thank you very much for your help! I"ll use a dropper to get the right amount of water. I had tried this technique before but I hadn't added any water to the mixture and the cake sadly just crumbled..I will take a look at the more detailed instructions too! Again, thanks for your help! :)
RispondiEliminaOh this happened to me as well. In my case, it was probably because I added too much baking powder! I find that baking powder is the most difficult ingredient to work with, if you use too much of it the clay literally crumbles to pieces, but if you don't use quite enough then there will be no bubbles at all. Kind of frustrating, really XD
EliminaThx for the tutorial!
RispondiEliminaThe texture looks so realistic and yummy :).
I've tried the baking soda technique to make a miniature cake,but instead of water I used vegetable oil to soften the clay.
The cake was very crumbly and the texture wasn't looking too realistic either,not to mention the horrible smell resulting from the baking process :|.Next time I will use water,so I hope I'll get much better results.
Ahahah I never thought of using oil but now I know I won't try! :D
EliminaI think water's only needed to get that thin, creamy consistence you need to mix in the baking powder properly; I can't really say that for sure, anyhow..
I'm back after I tried the tecnique again,this time with water.I was pleased to see the cake rising really well and the texture looking more spongy and realistic compared to what I've got the last time I tried.So I'll stick with this "recipe".
RispondiEliminaHehe,I know it was not the brightest ideea I had:D. Or maybe I used too much oil,I don't know(getting the right ingredient proportions is probably the trickiest part).The oil softens the clay nicely but now I prefere to replace it with water for the baking soda tecnique so,thank you again for the tips :).
OMG! Stella your work is so beautiful and this technique is WoW! Your my new mini food hero! Where did you learn this??? Love love love your blog!!!
RispondiEliminaAw thank you Natasha *blushes*
EliminaI'm so in love with this tecnique too!
I've learned it from the Shacchan @DeviantArt (http://shacchan.deviantart.com/); she found the original 'recipe' here: http://www.garieinternational.com.sg/clay/miniature_cake.htm - this one, however, uses paint thinners instead of liquid clay!
Ciao, io faccio i panettoni con una tecnica molto simile... :) Perché non provi a fare uno stampo in silicone per il pandoro, partendo da un modello fatto in fimo "normale"? Così potresti riutilizzarlo... io per i panettoni faccio così :)
RispondiEliminacomplimenti per tutto tutto tutto!
Eh si lo stampo in silicone sarebbe senz'altro meglio! Quando ho fatto questo l'anno scorso avevo solo questa pasta siliconica molto 'rigida' che non va bene per stampi così profondi.. adesso finalmente ne ho trovata una nuova, americana, che è favolosa, gli stampi vengono morbidissimi.. devo sicuramente provare a fare come dici tu! :D
EliminaE grazie *-*
thx for the tutorial! :)
RispondiEliminabut... does the clay get hard when baked this way, or is it soft/spongy?
You're very welcome! :D
EliminaThe clay should harden after baking. I've noticed that the times I've used too much baking powder, the clay stayed somewhat soft. I wouldn't recommend you to try this though, since it was very frail and basically crumbled into pieces XD
thanks for the answer :D
Eliminai think i'll just stick to my ususal methods then:) instead of risking my clay :D
but nice tutorial anyways XD